
This is an old revision of the document!
Installation
Due to the fact that Red Hat discontinued support for CentOS 8 at the end of 2021, VAS Experts offers a strategy for the continued use of Red Hat as Control Plane.
The transition to the new OS edition is planned in the form of an in-house upgrade (without reinstallation), within the framework of active technical support.
The transition to the new OS edition is planned in the form of an in-house upgrade (without reinstallation), within the framework of active technical support.
Before rack-mounting the server, make sure it meets necessary requirements.
If any discrepancies are found at this stage, contact VAS Experts technical support to promptly resolve the issue.
ISO Links
- VEOS 8.7 Sakhalin (SHA-256 checksum) for minimal installation.
Preparation of the installation USB memory stick
The currently most popular way to install an operating system on your computer is to install from a USB memory stick.
Do not use popular USB disk burning programs such as Rufus, Unetbootin, Multibootusb and Universal USB Installer – the VEOS installer WILL NOT work, as these programs do not properly copy the installation ISO image
To create a Linux/Unix installation USB disk, run the dd command:
> dd if=VEOS-8.6-x86_64-minimal.iso of=/dev/sdz
When writing, specify the entire disk, not the partition on it (i.e. /dev/sdz, but not /dev/sdz1)
You can download DD for Windows here.
If using dd for Windows, run dd --list and look carefully at the list of NT Block Device Objects and use the one that looks like \\?\Device\Harddisk1\Partition0 where the description is something like Removable media other than floppy. Block size = 512. Be very careful about which output device you pick or you may overwrite something you did not intend to!
Preparation of the installation disk
The most common way to install an operating system on a computer is to install from an installation DVD.
Recording a disk image in the MS Windows operating system
An ISO disk image file is a special format file prepared to burn on a disk. To burn an ISO image in the MS Windows use special programs: SCDWriter, Nero BurningROM and others.
Recording a disk image with Small CD-Writer
The entire process of burning an installation disk with Small CD-Writer consists of the following steps:
- download the image of the distribution disk;
- download the Small CD-Writer program archive http://gluek.info/wiki/_media/software/scdwriter14.zip;
- extract program files from the archive to any directory;
- insert a blank disc into the drive;
- enter the directory and run SCDWriter.exe;
- start Disk → Burn ISO image to disk and, in the window that appears, specify the path to the disk image;
- click the Burn button.
Recording a disk image in the Linux operating system
To burn ISO images it is recommended to use K3b or Brasero programs that come with any Linux distribution.
Recording a disk image with K3b
The entire process of burning an installation disk with K3b consists of the following steps:
- if the k3b program is missing, you need to install it on your system using the standard software installation tools for the distribution you have;
- run the k3b program. If properly configured, the program will tell you that there are no problems with the system and will prompt you to proceed to disk burning;
- in the Service main window menu, select Burn DVD image;
- in the Burn DVD image window that appears, click the Choose file to burn button. A dialog box will open in which you need to select the ISO image to burn and then click the OK button;
- the k3b program will show you the information about the ISO file and start calculating the checksum. This operation may take a few minutes. The checksum you get may be compared with the MD5SUM on the distribution page;
- if the checksums do not match, that means you have selected a wrong file for burning or the downloaded ISO image was broken during data transfer over the network;
- if the checksums match, insert the disk into your drive. Wait for the Start button to activate;
- click the Start button.
Installation
To boot your computer to install the system, you need to use the media containing the VEOS distribution.
Installation sequence
After successful initialization of the hardware, the bootloader menu with installation options is displayed:
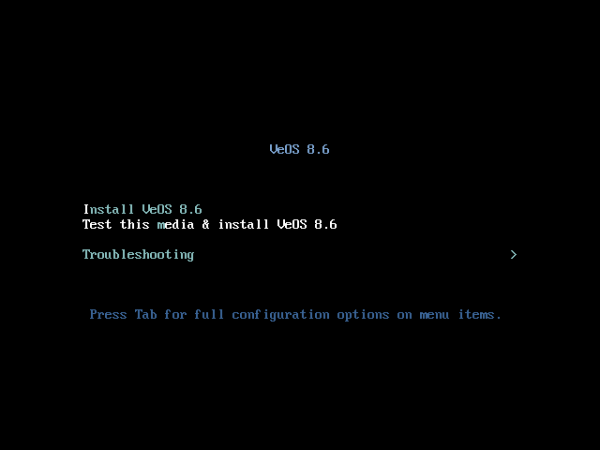
Selecting the normal installation option launches the graphical interface of the installer program. The installation process is divided into steps. Each step is dedicated to configuring or installing a particular feature of the system. The steps follow one after the other. You can move to the next step by pressing Next. If necessary, you can use the Back button to go back to a previous step and change the settings.
Technical information about the installation progress (log file) can be viewed by pressing Ctrl+Alt+F1, return to the graphical installer – Ctrl+Alt+F7. By pressing Ctrl+Alt+F2 the debugging virtual console opens. Each step is accompanied by brief help that can be accessed by clicking the Help button or by pressing the F1 key. The following steps are used to install the system:
- choosing the language of the installation interface;
- configuring OS installation options – keyboard layout, language support, date and time zone settings, disk partition preparation, network configuration, security policy configuration, and administrator account creation;
- installing the system on the selected disk;
- finishing installation and rebooting.
- When partitioning a disk for SSG software:
 ~ 20 GB for root partition
the rest of the space can be allocated for the /var directory
The Stingray SG partition does not use swap, but it may be required for system tasks, so 4GB can be allocated
- Disable Hyper-threading in BIOS for SSG software!
Pre-configuring VEOS
If you received a preinstalled system from us, please immediately refer to the Appliance installation instruction section.
Otherwise, you need to install the VEOS operating system on your server yourself and give us remote SSH access and root rights to perform the installation and initial configuration of the platform. After the work is completed, the remote access can be closed.
- Create a vasexpertsmnt user:
adduser -m -G wheel -u 3333 vasexpertsmnt
- Set a complex password for the user vasexpertsmnt:
passwd vasexpertsmnt
For convenience, you can generate a password using openssl:
openssl rand -base64 15
- Save the password for vasexpertsmnt.
- Set permission for users of the wheel group to use all commands on behalf of all users, for this you need to add to /etc/sudoers the line:
% wheel ALL=(ALL) NOPASSWD: ALL
- To provide remote access via SSH and set restrictions on valid IP addresses from the list:
45.151.108.0/22, 94.140.198.64/27, 78.140.234.98, 193.218.143.187, 93.100.47.212, 93.100.73.160, 77.247. 170.134, 91.197.172.2, 46.243.181.242, 93.159.236.11
iptables -A INPUT -m conntrack --ctstate RELATED, ESTABLISHED -j ACCEPT iptables -A INPUT -p tcp -s 45.151.108.0/22 -m tcp --dport 22 -j ACCEPT iptables -A INPUT -p tcp -s 94.140.198.64/27 -m tcp --dport 22 -j ACCEPT iptables -A INPUT -p tcp -s 78.140.234.98 -m tcp --dport 22 -j ACCEPT iptables -A INPUT -p tcp -s 193.218.143.187 -m tcp --dport 22 -j ACCEPT iptables -A INPUT -p tcp -s 93.100.47.212 -m tcp --dport 22 -j ACCEPT iptables -A INPUT -p tcp -s 93.100.73.160 -m tcp --dport 22 -j ACCEPT iptables -A INPUT -p tcp -s 77.247.170.134 -m tcp --dport 22 -j ACCEPT iptables -A INPUT -p tcp -s 91.197.172.2 -m tcp --dport 22 -j ACCEPT iptables -A INPUT -p tcp -s 46.243.181.242 -m tcp --dport 22 -j ACCEPT iptables -A INPUT -p tcp -s 93.159.236.11 -m tcp --dport 22 -j ACCEPT iptables -A INPUT -p tcp --dport 22 -j DROP service iptables save
If you are using firewalld:
firewall-cmd --permanent --zone = public --add-rich-rule = 'rule family = "ipv4" source address = "45.151.108.0/22" service name = "ssh" accept'
firewall-cmd --permanent --zone = public --add-rich-rule = 'rule family = "ipv4" source address = "94.140.198.64/27" service name = "ssh" accept'
firewall-cmd --permanent --zone = public --add-rich-rule = 'rule family = "ipv4" source address = "78.140.234.98" service name = "ssh" accept'
firewall-cmd --permanent --zone = public --add-rich-rule = 'rule family = "ipv4" source address = "193.218.143.187" service name = "ssh" accept'
firewall-cmd --permanent --zone = public --add-rich-rule = 'rule family = "ipv4" source address = "93.100.47.212" service name = "ssh" accept'
firewall-cmd --permanent --zone = public --add-rich-rule = 'rule family = "ipv4" source address = "93.100.73.160" service name = "ssh" accept'
firewall-cmd --permanent --zone = public --add-rich-rule = 'rule family = "ipv4" source address = "77.247.170.134" service name = "ssh" accept'
firewall-cmd --permanent --zone = public --add-rich-rule = 'rule family = "ipv4" source address = "91.197.172.2" service name = "ssh" accept'
firewall-cmd --permanent --zone = public --add-rich-rule = 'rule family = "ipv4" source address = "46.243.181.242" service name = "ssh" accept'
firewall-cmd --permanent --zone = public --add-rich-rule = 'rule family = "ipv4" source address = "93.159.236.11" service name = "ssh" accept'
firewall-cmd --reload
firewall-cmd --zone = public --remove-service = ssh --permanent
!Save your settings as the server will be rebooted during installation!
After making sure that remote access via SSH is provided, send to technical support of VAS Experts (Service Desk) file an application for installation of the Stingray SG DPI license with the password and username for SSH access.
Installation of the Stingray software is carried out by engineers or by yourself according to the instruction: Instructions for installing the Stingray software using the script.
Was this information helpful?