


This is an old revision of the document!
QoE Stor Configuration
To go to the section, click the ADMINISTRATOR menu item, then click the QOE STOR CONFIGURATION menu item.
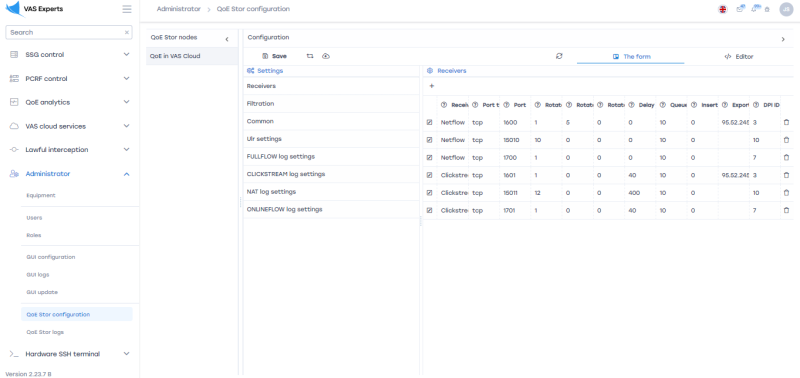
QoE Stor Nodes
This subsection contains the user's servers. To create or view a custom server that provides access to work in the "QoE Stor Configuration", you need to go to «Equipment»
Configuration
This subsection contains the following settings:
1 Receivers
To add it, click on the "Add receiver" button, fill in the following parameters in the window that opens:
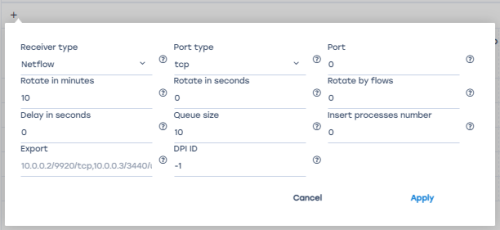
- The receiver type is selected from the drop-down list.
- Rotation in minutes is specified manually by the user. Implies the period of the receiver dump or the period of data loading into the databas.
By default: receiver type – Netflow, rotation – 10 min;
receiver type – Clickstream, rotation - 12 min.
Note: Do not change the value unnecessarily.
- The delay in seconds is specified manually by the user. Implies a delay in loading data from the database.
By default: receiver type – Netflow, delay – 0 sec;
receiver type – Clickstream, delay - 400 sec.
Note: Do not change the value unnecessarily.
- Exporting data to other servers. The server address is entered manually by the user.
- The port type is selected from the drop-down list.
- Rotation in seconds is specified manually by the user. Implies the period of the receiver dump or the period of data loading into the database.
Note: If this option is enabled, the rotation in minutes option is automatically disabled.
- The queue size is specified manually by the user. Implies the size of the receiver dump download queue.
Default value: 10.
Note: Do not change the value unnecessarily.
- The DPI ID specifies the DPI number. If the value "-1" is specified or not specified, then the DPI number is determined by the recipient's order in the list.
Note: Do not change the value unnecessarily.
- The port is a unique parameter and is entered manually by the user.
By default: receiver type – Netflow, port – 1500; receiver type – Clickstream, port - 1501.
- Rotation by the number of entries in the flow. It works simultaneously with the rotation parameter in minutes or seconds.
- The number of dump insertion processes. Without having to change the value.
To change the saved receiver, click on the "Change" button located to the left of each receiver.
To remove the receiver, click on the "Delete" button located to the right of each receiver.

2 Filtering
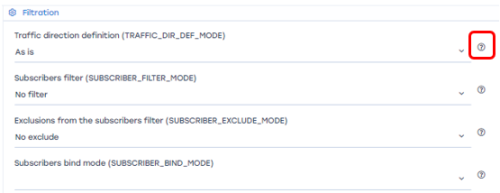
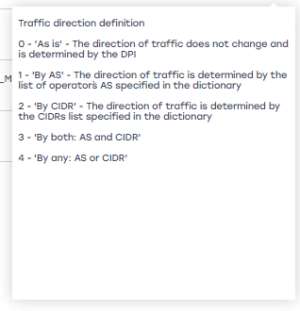
All parameters are specified by selecting from the output list.
To explain the selection, you can click on the auxiliary button located to the right of each parameter.
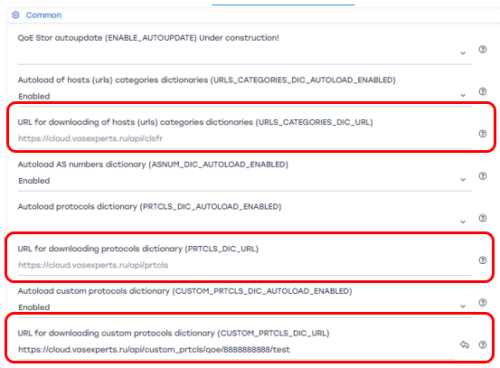
3 General
Parameters are specified by selecting from the output list, URLs are entered manually by the user.
To explain the selection, you can click on the auxiliary button located to the right of each parameter.
4 URL Settings
All parameters are specified by selecting from the drop-down list. To explain the selection, you can click on the auxiliary button located to the right of each parameter.
5 FULLFLOW Log Settings
All parameters are specified by selecting from the output list. To explain the selection, you can click on the auxiliary button located to the right of each parameter.
| Параметр | Описание | Возможные значения |
|---|---|---|
FULLFLOW_COMPRESS_ENABLE |  Experimental setting, DO NOT change this yourself! Experimental setting, DO NOT change this yourself!Enable background log compression for FULLFLOW | 0 — Off1 — On |
FULLFLOW_REPLACE_IP_CLASS_WITH_ORIGINAL_TOS | Enable DSCP from Original TOS Allows you to use the original Type of Service (ToS) value from the packet's IP header instead of the value assigned by DPI. When this option is enabled, the traffic class extracted from the original ToS will be displayed in the statistics and QoE reports. Two fields are transmitted from DPI to IPFIX: - IP_CLASS_OF_SERVICE — the traffic class assigned by DPI based on DSCP settings (by protocols and autonomous systems)- originalTOS — the original value of the ToS field from the IP header before DPI processing (the first 3 bits contain the traffic class)By default, IP_CLASS_OF_SERVICE is used. When this parameter is enabled, the value from originalTOS is used.Important: To correctly transmit the full DSCP value, you must set ‘'netflow_tos_format=1’' in the fastdpi.conf file. Otherwise, only the traffic class is transmitted, not all DSCP bits. | 0 — Off1 — On |
IPFIX_FULLFLOW_ENBALE_BLOCKED_DATA | Enable collection of blocked traffic data Enables the collection of statistics on blocked traffic: the number of discarded packets and bytes. | 0 — Off1 — On |
IPFIX_FULLFLOW_BLOCKED_DROP_THRESHOLD | Threshold for classifying traffic as “drop” If the ratio of dropped packets to forwarded packets exceeds the specified threshold, such traffic is marked as “Blocked.” | A coefficient ranging from 0 to 1, including floating-point numbers. Default value: 0.9 |
IPFIX_FULLFLOW_BLOCKED_POLICING_THRESHOLD | Threshold for classifying traffic as policed If the ratio of dropped packets to forwarded packets exceeds the specified threshold, such traffic is marked as policed. | A coefficient ranging from 0 to 1, including floating-point numbers. Default value: 0.1 |
FULLFLOW_VOIP_GROUP_FIELDS_ENABLE | Enable VOIP Traffic Data This setting enables the processing and collection of statistics for generating reports on VOIP traffic. Important: This setting is complex and requires the involvement of technical support specialists. Enabling it alone will not generate reports or produce any visible results—additional system configuration is required. | 0 — Off1 — On |
6 CLICKSTREAM Log Settings
All parameters are specified by selecting from the drop-down list. To explain the selection, you can click on the auxiliary button located to the right of each parameter.
7 NAT Log Settings
All parameters are specified by selecting from the output list. To explain the selection, you can click on the auxiliary button located to the right of each parameter.
8 ONLINEFLOW Log Settings
All parameters are specified by selecting from the output list. To explain the selection, you can click on the auxiliary button located to the right of each parameter.
9 OpenCellID settings
To enable autoload of OpenCellID catalog, select “Enabled”.

- CELL_TOWER_LOADER_API_TOKEN - token in LocalAPI platform. Get a token in the service LocationAPI.

- CELL_TOWER_LOG - level of log.

- CELL_TOWER_RESPONSE_HOUR - time interval to update empty data cell towers for report of geo position, hours.

Token OpenCellID


Save settings
To save the settings in the configuration, click on the "Save" button located on the left in the toolbar.
To restart the configuration, click on the "Restart" button located in the toolbar.
To update the settings, click on the "Update" button located in the toolbar.

Was this information helpful?