


This is an old revision of the document!
QoE Stor Configuration
To go to the section, click the ADMINISTRATOR menu item, then click the QOE STOR CONFIGURATION menu item.
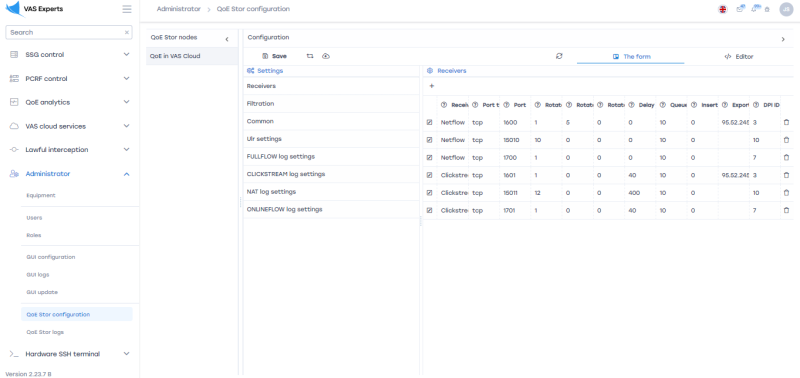
QoE Stor Nodes
This subsection contains the user's servers. To create or view a custom server that provides access to work in the "QoE Stor Configuration", you need to go to «Equipment»
Configuration
This subsection contains the following settings:
1 Receivers
To add it, click on the "Add receiver" button, fill in the following parameters in the window that opens:
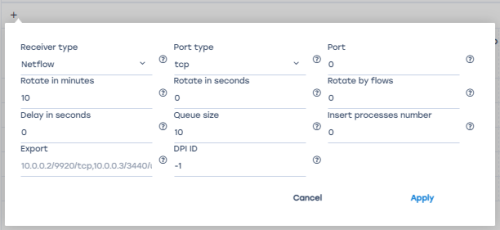
- The receiver type is selected from the drop-down list.
- Rotation in minutes is specified manually by the user. Implies the period of the receiver dump or the period of data loading into the databas.
By default: receiver type – Netflow, rotation – 10 min;
receiver type – Clickstream, rotation - 12 min.
Note: Do not change the value unnecessarily.
- The delay in seconds is specified manually by the user. Implies a delay in loading data from the database.
By default: receiver type – Netflow, delay – 0 sec;
receiver type – Clickstream, delay - 400 sec.
Note: Do not change the value unnecessarily.
- Exporting data to other servers. The server address is entered manually by the user.
- The port type is selected from the drop-down list.
- Rotation in seconds is specified manually by the user. Implies the period of the receiver dump or the period of data loading into the database.
Note: If this option is enabled, the rotation in minutes option is automatically disabled.
- The queue size is specified manually by the user. Implies the size of the receiver dump download queue.
Default value: 10.
Note: Do not change the value unnecessarily.
- The DPI ID specifies the DPI number. If the value "-1" is specified or not specified, then the DPI number is determined by the recipient's order in the list.
Note: Do not change the value unnecessarily.
- The port is a unique parameter and is entered manually by the user.
By default: receiver type – Netflow, port – 1500; receiver type – Clickstream, port - 1501.
- Rotation by the number of entries in the flow. It works simultaneously with the rotation parameter in minutes or seconds.
- The number of dump insertion processes. Without having to change the value.
To change the saved receiver, click on the "Change" button located to the left of each receiver.
To remove the receiver, click on the "Delete" button located to the right of each receiver.

2 Filtering
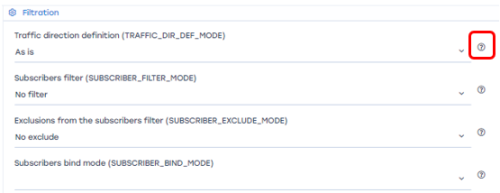
All parameters are specified by selecting from the output list.
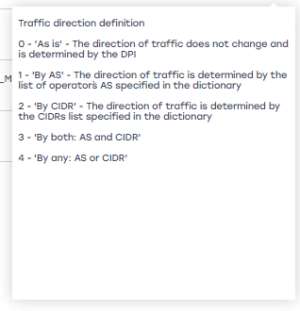
To explain the selection, you can click on the auxiliary button located to the right of each parameter.
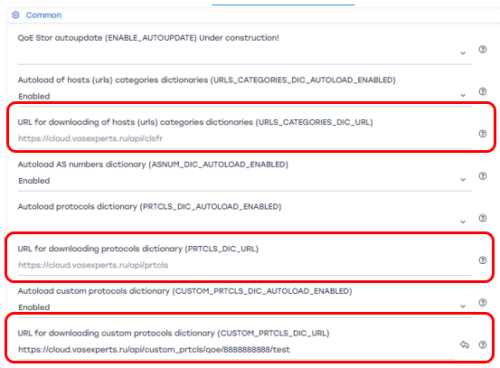
3 General
Parameters are specified by selecting from the output list, URLs are entered manually by the user.
To explain the selection, you can click on the auxiliary button located to the right of each parameter.
4 URL Settings
All parameters are specified by selecting from the drop-down list. To explain the selection, you can click on the auxiliary button located to the right of each parameter.
5 FULLFLOW Log Settings
All parameters are specified by selecting from the output list. To explain the selection, you can click on the auxiliary button located to the right of each parameter.
| Параметр | Описание | Возможные значения |
|---|---|---|
FULLFLOW_COMPRESS_ENABLE |  Экспериментальный параметр, НЕ изменять самостоятельно! Экспериментальный параметр, НЕ изменять самостоятельно!Включить фоновое сжатие логов FULLFLOW | 0 — Отключено1 — Включено |
FULLFLOW_REPLACE_IP_CLASS_WITH_ORIGINAL_TOS | Включить DSCP из исходного TOS Позволяет использовать исходное значение ToS (Type of Service) из IP-заголовка пакета вместо значения, назначенного DPI. При включении параметра в статистике и QoE будет отображаться класс трафика, извлечённый из originalTOS. В IPFIX от DPI передаются два поля: - IP_CLASS_OF_SERVICE — класс трафика, назначенный DPI на основе настроек DSCP (по протоколам и автономным системам)- originalTOS — исходное значение поля ToS из IP-заголовка до обработки DPI (первые 3 бита содержат класс трафика)По умолчанию используется IP_CLASS_OF_SERVICE. При включении параметра используется значение из originalTOS.Важно: для корректной передачи полного значения DSCP необходимо установить netflow_tos_format=1 в файле fastdpi.conf. В противном случае передаётся только класс трафика, а не все биты DSCP. | 0 — Отключено1 — Включено |
IPFIX_FULLFLOW_ENBALE_BLOCKED_DATA | Включить сбор информации о заблокированном трафике Включает сбор статистики по заблокированному трафику: количество отброшенных пакетов и байт. | 0 — Отключено1 — Включено |
IPFIX_FULLFLOW_BLOCKED_DROP_THRESHOLD | Порог значения для определения трафика как drop Если отношение числа отброшенных пакетов к числу пропущенных превышает указанный порог, такой трафик маркируется как Заблокированный. | Коэффициент от 0 до 1, включая числа с плавающей точкой. Значение по умолчанию: 0.9 |
IPFIX_FULLFLOW_BLOCKED_POLICING_THRESHOLD | Порог значения для определения трафика как полисинг Если отношение числа отброшенных пакетов к числу пропущенных превышает указанный порог, такой трафик маркируется как Подвергшийся полисингу. | Коэффициент от 0 до 1, включая числа с плавающей точкой. Значение по умолчанию: 0.1 |
FULLFLOW_VOIP_GROUP_FIELDS_ENABLE | Включить данные VOIP трафика Данная настройка включает обработку и сбор статистики для формирования отчётов по VOIP-трафику. Важно: параметр является комплексным и требует участия специалистов технической поддержки. Само по себе его включение не приведёт к появлению отчётов или каких-либо видимых результатов — необходима дополнительная настройка системы. | 0 — Отключено1 — Включено |
6 CLICKSTREAM Log Settings
All parameters are specified by selecting from the drop-down list. To explain the selection, you can click on the auxiliary button located to the right of each parameter.
7 NAT Log Settings
All parameters are specified by selecting from the output list. To explain the selection, you can click on the auxiliary button located to the right of each parameter.
8 ONLINEFLOW Log Settings
All parameters are specified by selecting from the output list. To explain the selection, you can click on the auxiliary button located to the right of each parameter.
9 OpenCellID settings
To enable autoload of OpenCellID catalog, select “Enabled”.

- CELL_TOWER_LOADER_API_TOKEN - token in LocalAPI platform. Get a token in the service LocationAPI.

- CELL_TOWER_LOG - level of log.

- CELL_TOWER_RESPONSE_HOUR - time interval to update empty data cell towers for report of geo position, hours.

Token OpenCellID


Save settings
To save the settings in the configuration, click on the "Save" button located on the left in the toolbar.
To restart the configuration, click on the "Restart" button located in the toolbar.
To update the settings, click on the "Update" button located in the toolbar.

Was this information helpful?